|
|
Padco Finish & Trim Pads provide a fast, flawless finish and they’re easy to use. Just follow these steps and you will have a professional quality floor.
They are the professional’s choice for application of oil and water based floor finishes and waxes. They are not recommended for use with shellac or high concentrations of xylol, acetone, or ketone.
Before you begin
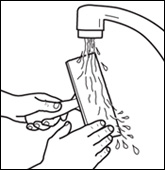
 To insure no dust or particles get into the finish, all applicators should be preconditioned. Vacuum the applicator pad thoroughly. You can also rinse it under running water and rub the fibered surface. When done towel dry the applicator. If the finish you are using is water based, you can proceed. If the finish is solvent based, wait for the pad to dry before use. To insure no dust or particles get into the finish, all applicators should be preconditioned. Vacuum the applicator pad thoroughly. You can also rinse it under running water and rub the fibered surface. When done towel dry the applicator. If the finish you are using is water based, you can proceed. If the finish is solvent based, wait for the pad to dry before use.
Be sure the floor has been properly sanded, screened, vacuumed and tacked. Keep forced air heat and air conditioning off to prevent dust contamination. Keep the temperature within the recommended range. Follow the manufacturer’s ventilation guidelines.
Helpful tools to make your job easier
- Extension pole
- Cloths or paper towels
- Roller tray or watering can
Applying finish to hardwood floors
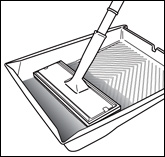
 Use a roller tray - You can use a roller tray to dip the applicator in making sure to apply finish to the foam and fibered surface, not onto the plastic handle. Load the pad generously. Avoid wiping the pad on the edge of the tray to remove excess finish as this can impart bubbles into the finish. Use a roller tray - You can use a roller tray to dip the applicator in making sure to apply finish to the foam and fibered surface, not onto the plastic handle. Load the pad generously. Avoid wiping the pad on the edge of the tray to remove excess finish as this can impart bubbles into the finish.
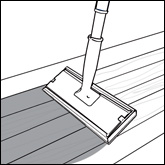
 Start in the corner opposite the door you will exit from. Keep the pad inclined to the floor as pictured and let the front edge of the pad do the work. Make long smooth strokes in the direction of the wood grain. Apply an even coat, keeping a “wet edge”. Feather the beginning and end of each stroke to avoid visible lap marks. Regularly inspect the area you have finished to make sure that there are no skip marks or puddles. Start in the corner opposite the door you will exit from. Keep the pad inclined to the floor as pictured and let the front edge of the pad do the work. Make long smooth strokes in the direction of the wood grain. Apply an even coat, keeping a “wet edge”. Feather the beginning and end of each stroke to avoid visible lap marks. Regularly inspect the area you have finished to make sure that there are no skip marks or puddles.
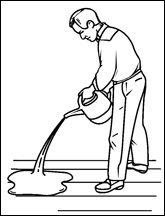
 Use a pour bucket or watering can - You can also apply finish by pouring it onto the floor using a pouring bucket or watering can. Pour a long stripe of finish most of the length of the room in the same direction as the wood grain. Use a pour bucket or watering can - You can also apply finish by pouring it onto the floor using a pouring bucket or watering can. Pour a long stripe of finish most of the length of the room in the same direction as the wood grain.
By angling the tool slightly you can “snowplow” the finish as you walk, keeping the tool on the floor the entire length of the room in one long stroke. When you reach the end of the room, make a feathered stroke from the end wall back in the direction you came from to insure a uniform finish.
Repeat this procedure as you work your way across the room. As you approach the final pass along the wall, be careful to pour just enough to reach the door without a puddle of excess finish. Follow the finish manufacturer’s recommendation regarding drying times before recoating or using your new floor.
|