|
Instructions for PadBRUSHing in Three Colors
A dictionary will tell you that ancient fresco is the art and technique of painting with water colors on a wall surface of wet plaster. Fresco is an age old art that provides soft, subtle colors and a finish of great depth. It is centuries old. This PadBRUSH system brings the beauty of old world fresco painting into your world today.
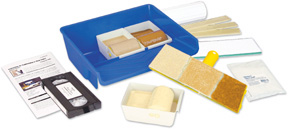
Your new Padco PadBRUSH Painting System allows the blending of three colors to produce a variety of innovative looks, from subtle to dramatic. To create faux finish effects, your kit includes a tray, one 10" Paint transfer wheel, three color cups, three 3" paint transfer wheels, one 10" PadBRUSH handle, two 10" refill pads, three stir sticks, and instruction sheet and a video.
Other tools that are useful, but not included in the kit are: the Padco #2200 edger with wheels, a 2" paint brush, masking tape, a damp rag for cleanup, a drop cloth, and three containers for mixing paint and glaze.
Your kit includes:
10" PadBRUSH Handle
Two 10" PadBRUSH Refill Pads
PadBRUSH Tray with Wheel
Three Color Cups with Wheels
Stir Sticks
Instructional Video
Instruction Sheet
There are five steps to creating your finished look.
1) Getting ready to paint
2) Surface preparation.
3) Base coating.
4) Color selection and mixing.
5) Pad Brushing in 3 colors.
1) Getting ready to paint. Means preparing the room in which you’ll be working. Examples include removing any furniture or rugs from the room, covering drapes, removing switch and outlet plates, and protecting the floor with a drop cloth, newspaper or other covering.
2) Surface preparation. Padco recommends you read and follow the surface preparation guidelines of the paint manufacturer, which are usually printed on the paint can. As a part of surface preparation, many painters find that they achieve a better paint job and work faster by using masking tape around doorways, windows, baseboard and ceilings. Masking tape should be applied before base coating and removed before the base coat dries. Tape should be re-applied before the 3 color coating and removed before the faux finish is dry.
3) Base coating. Although the base coat can be applied with a conventional brush or roller, we encourage you to base coat using the blue tray, the large 10" wheel and the 10" PadBRUSH. This will build familiarity with the tools and make it easier to PadBRUSH in three colors. When base coating, you may also use a Padco wheeled edger or a 2" paint brush for edging. Begin your base coating by installing the large Paint Transfer Wheel in the blue tray. To attach the self stick pads to the 10" tool, first remove the release paper, then position the pad, and press into firm contact with the plastic handle.
When pouring paint into the tray, do not allow the paint level to be more than half way up on the wheel. The base coat should be a water-based eggshell or semigloss latex paint in either white or off-white. Depending on your choice of colors and your painting technique, the base color may show through as a fourth color. Just prior to painting, wash the pad in running water. Squeeze the pad like a sponge. This will remove loose fibers and prepare the PadBRUSH for paint application. After rinsing, squeeze out the excess water. Then damp dry the pad with a rag or paper towels. When base coating, Padco recommends that you first edge paint the entire room wherever wall meets ceiling, wall meets wall and around doorways, windows and baseboards. Edging can be done with a Padco Wheeled Edger #2200 or with a 2" paint brush.
After all edging is complete, fill in the open spaces. Avoid using the pad surface to scrub back and forth on the wall. It is better to spread the paint with the leading edge of the pad. Make your strokes in many directions, not just up and down. As you exhaust the paint supply in the leading edge of the tool, it is natural and almost automatic that you begin to flatten the pad against the wall to tap the reservoir of paint in the rear area of the pad. Lastly, make finishing strokes where the pad surface gently contacts the wall and smooth the paint surface to remove “ brush marks.”
When all of the base coating is finished and before the paint dries, be sure to remove the masking tape. Although the base coat will be dry to the touch in only a few hours, you are advised to wait at least 48 hours before painting in three colors. This time delay allows the base coat to cure.
The conclusion of the base coating step is to clean all tools so they may be used again for the three-color second coat that follows. To clean the pad, you have the option to 1) water clean up or 2) no clean up. No clean up means you strip the self stick pad and throw it away. Take a new pad for the next step of painting in three colors. Water clean means washing and rinsing the pads in running water. DO NOT remove the self stick pads from the plastic handles. Hold the tool in running water. Use your fingers, since no gloves are needed for water clean up. Massage the pad like it was a sponge. Squeeze out the excess water and dry the pad with a cloth or paper towel. Hang the tools to dry.
4) Color selection and mixing. The 48 hour wait period is a good time to select and mix your three colors and to reapply the masking tape. Let’s talk about color selection. Choose three colors that blend with the furnishings of your room. These may be three shades of the same color or three shades of three different colors. Although there is no right or wrong, three shades of the same color may be easiest for beginners. At your paint store you will find monochromatic color strips. These strips show different shades of the same color from lightest to darkest. Choose three shades from one strip. Ideally they should be two to three shades apart. Interior decorators and paint chemists agree that another element to success is to blend water-based glaze with water based latex paint. Glaze dries to a clear coating that creates soft, translucent effects, not attainable when using paint straight from the can.
Padco recommends that you mix four parts glaze to one part paint. The use of glaze slows drying, creating “open time”, which allows the painter to “move paint around on the wall” and create a uniform pattern. Drying can be further extended up to 60 minutes by using more glaze in proportion to paint, but not more than a 6 to 1 ratio of glaze to paint. It’s better to mix enough paint for the entire project and not count on being able to get a perfect match in case you have to mix more paint. Prepare the paint/glaze mixture for all three colors. Be sure to mix thoroughly. A quart of glaze/paint mixture should cover about 100 square feet of wall surface.
5) PadBrushing in 3 colors. For PadBrushing in three colors use the blue tray, the three “Color Cups”, the three small wheels, and the 10" pad brush. Place the “color cups” into the tray. Pour the three colors into the “color cups.” Do not allow the paint level to be above the wheel axle. Padco recommends the medium color be placed in the center cup. When the pad is wiped on the three wheels, the three colors are equally spread onto the pad. This gives you a unique blending tool. Your paint mixing will take place on the wall, before your eyes.
Before actually painting on your wall, it is a good idea to practice. Since PadBrushing can create so many different effects, practicing gives you the opportunity to define your desired look. A variety of surfaces can be used for practicing, such as: 3M “post-It” easel pads available from an office supply store. These are large “Post-it” notes that self stick to a wall surface. You may also use poster board, about 22 x 28 inches, scraps of drywall, properly base coated, or wallpaper leftovers.
Once you’ve decided upon a design and stroking technique, you are ready to paint your base coated wall in three colors. Begin applying the three colors to your wall by using the stroke you found most desirable in your practice. Note, that in base coating we first did the edging. Now in three color painting, we will do the edging last. Work rapidly, but do not rush. The use of glaze will slow drying and give you time to create a uniform look to the entire wall surface. As you move across the wall, spread the paint favoring the font edge of the pad. If more paint is needed, flatten out the pad. Less stroking maximizes color contrast. More stroking results in more blending, as the three colors tend to become one color.
Because the addition of the glaze slows drying time, you can go back and add color here and there as necessary for about 30 minutes. For example, if you step back and see that one area needs more dark highlights, use the right or left edge of the pad, whichever has the dark paint, to pick up a touch of that paint from the transfer wheel. Then add that dark paint to wherever it is needed on the wall. Similarly, use the opposite edge of the PadBRUSH to pick up a touch of light paint from the transfer wheel and add that light color paint to where it is needed on the wall. Use the edging tool or paintbrush on the center paint wheel to pick up and add that color and add it where you desire the medium color effects.
This manipulation of the paint can continue as long as the glaze keeps it wet. Never let your edge dry. This will create an undesirable overlapping look. Keeping the edge of your design wet will offer the best blending possible. Always paint from the dry wall surface into the surface that is already painted. Keep in mind that no two painters will paint using the identical stroking pattern. A good rule is "do not allow two painters to paint the same wall". Once an area is completed the corners and edges need to be blended in. The glaze will allow “open time” to smoothly blend the edges into the centered area of the wall. Use the paintbrush or edging tool to create small strokes that match your wall painting. Also use this technique to finish the top and bottom edges. After three color painting be sure to remove the masking tape before the paint is dry.
To maintain your kit for future use, use water to clean up the wheels, tray, pads and brushes. If the pad will not be used within the next few days, remove the pad from the handle and discard the used pad.
In no time, you can turn a dull room into a masterful creation with your easy to use PadBRUSH kit from Padco. Use your imagination... experiment... have fun. It’s your turn to create! |